
Welcome to part 2 of 2 of post on CCIO’s configuration. It’s time to discuss security. This post is not a guide on implementation but an open discussion of how we configured our security and suggestions for other operators. Some sections link back to past blog posts which discuss the security suggestion in more detail and even provide steps for implementation. Now onto the discussion.
Security is an area I feel passionate about, especially with the history of the cryptocurrency industry having fly by night operators, hacked exchanges with gaping security holes and fraudulent ICO’s, just to name a few of the things that has given this industry a bad name. Let me share more than a decade of Best Practices in system security that CCIO has used in our implementation.
Many of the concepts here were learned over a number of years. Our experience stems from providing solutions and enterprise IT services for a number of industries. This means not only have we hardened individual servers, but also implemented security policies organization wide including PCI DSS level D self assessments for merchants and service providers. While PCI DCC has lots of requirements, the self assessment really doesn’t explain how to implement all that security. So before we just tell you what what we did and what you “should do”, we wanted to point you at resources you can use in your journey so you can make an educated decision on how to implement your own security.
First I’m a big fan of using the vendor content when its available. There are literally hundreds of ways you could do something, but there are reasons that vendors come up with a specific way to implement settings. If it isn’t too limiting for your needs to follow their instructions it will generally get you more mileage as the guide for your specific OS release has focus on the tools and changes the vendor has implemented over time. We happen to prefer CentOS coming from the enterprise we used it years before Ubuntu existed. CentOS is Red Hats free downstream rebuild and if you use it just follow Red Hat guides. However we also know that a majority of people new and old alike use Ubuntu, so we will link security guides below even though CCIO does not use Ubuntu.
Beyond the vendors guides there are two other things I want to mention, as some concepts which have made their way into the vendors guides came from other sources and agencies that spend lots of time on these topics. Since we have used these resources to secure systems we thought you might want to know about them.
Fist off there is Security Technical Implementation Guides or STIG from the DoD security exchange at public.cyber.mil. They have security guides for just about everything, from appliances like network and wireless equipment to cloud appliances and Operating Systems. Their guides are pretty long and more than we suggest for the average security enthusiast, but if your really into security you will probably enjoy a few items from them. If your doing this en masse I suggest you check out the SCAP section which is Security Content Automation Protocol, it can really help you save time validating if you have to comply with a certain level of system hardening on hundreds of systems.
OK that was a lot before even starting on the CCIO configuration and what we hope begins a deeper discussion on Stake Pool Security Best Practices and hopefully evolves into a full guide. However with all Best Practices its best to understand the security implication and determine your risk. Just because we do all of this doesn’t mean you have to, but it’s probably a pretty good target for you to strive to achieve.
Filesystem Security
Temp Filesystems
Throughout this section when we speak about /tmp we mean all temp filesystems. So references to /tmp also apply to /var/tmp or any temp filesystem you have.
One change you can make to your temporary filesystems to improve security is to set mount options which prevent attackers from exploiting them to gain control of your system. You can append these to the options in your /etc/fstab file. You can then daemon-reload systemctl to have it parse the options into the systemd mount units for you.
The three options we suggest are:
- nodev
- noexec
- nosuid
nodev
Prevents the OS from interpreting character or block special devices on the filesystem. This means an attacker cant fake a /dev/sda or other type of device inside /tmp or make it appear like a usb keyboard is plugged in via /tmp and controlling the console input.
noexec
Prevents binary, scripts, etc. from being executed while in /tmp. Since any account can write into /tmp this was often where attackers would place scripts they wanted to have executed.
nosuid
Does not allow set-user-identifier or set-group-identifier bits to take effect on the filesystem. Since there are ways to exploit set user/group bits to escalate privileges it’s best to just disallow this on /tmp
You can imeplement these in /etc/ftab by making the line look similar to:
UUID=0aef28b9-3d11-4ab4-a0d4-d53d7b4d3aa4 /tmp ext4 defaults,nodev,nosuid,noexec 1 2
SELinux Enabled
Listen, we know it’s easy to disable it when you don’t understand why something doesn’t work, but it’s 2020. Leave it fully enabled and most of the time you won’t even notice you left it on. If something isn’t working and you think it could be related check out your audit log for messages. If you do find something ask for assistance on creating the proper allow rule before just disabling SELinux. Here is a diagram to give you a simple understanding.
Your application/process attempts to read. This request runs through SELinux in the kernel and checks a database of policies. Based on the policy DB it either allows or denies the action. When it allows the action everything should seem just like it is with SELinux disabled. However when it denies an action it logs an AVC Denied message into your audit log.
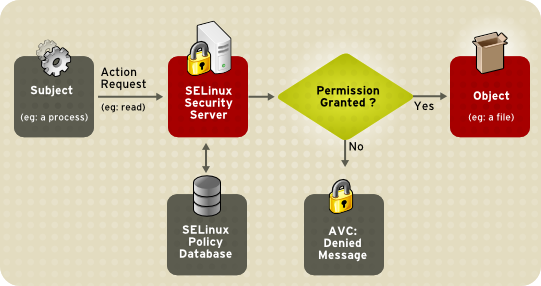
On RHEL/CentOS this aforementioned audit log is /var/log/audit/audit.log. It will contain messages, although cryptic, explaining what it prevented from happening. The AVC’s can be copied out and used with the audit2allow utility to create a custom policy. These custom SELinux policies are added to the policy database and the next time your application/process attempts the action it now passes the policy check and succeeds.
There may be more than one AVC rule you need to generate for you application. Be patient and work through it, the safety here far outweighs the risk when someone gets in through a bug or security hole in an application.
Hardware & Services
Disable removable boot options
Disabling external/remote boot devices in the BIOS protects the computer from being booted with a live USB stick or DVD. If reinstall of the OS or a system recovery is required they can be re-enabled easily within a few minutes.
Minimized Package Sets
Meaning if your not compiling programs don’t install gcc and development tools. If you don’t use X Windows, don’t install it and run a GUI. We like to start of with CentOS Minimal as the easiest way to achieve this goal. While services like sql, web, bind, etc. are all still available for selection during install this profile by default does not install them.
This wastes less disk space and reduces the amount of packages to upgrade during patching cycles.
Disable unused services
Having extra services running creates and extra attack vector for bad actors. Services like bluetooth, CUPS and Avahi are often not needed, especialy in a colocation environment. Do you need a print server, zeroconf autodiscovery, or the ability to sync a bluetooth keyboard? Unlikely in a colocation or even if you run your SPO from home.
You can disable services like cups with systemctl. This can be achieved in two commands, disable and stop, or combined into a single command which disables and stops the service like so:
sudo systemctl disable --now cups.service
Firewall
Software Firewall
Use Iptables, ufw or firewalld. We even use it with cloud VMs that come with cloud firewalls. Why you ask? Multiple reasons.
- If you mistakenly leave open your cloud firewall your host will block the ports if you didn’t add it to the host firewall rules.
- Provides a better security profile for using tools like knockd. Any would be attacker scanning your system still see’s ports as filtered instead of open. Generally if you don’t give attackers clue’s about which ports to try knocking on, they won’t bother. The host based firewall achieves this.
Really big enterprise companies have lost data on AWS in the last 5 years. If their cloud security architects, who some were certified in AWS, can make a mistake of that level nobody is immune? Keep those firewalls running. If you need to add port 3001 to firewalld and make it persist a reboot you can use the following commands:
sudo firewall-cmd --add-port 3001/tcp --permanent
sudo firewall-cmd --reload
fail2ban
Implement fail2ban on any port exposed to the internet. Why would you fail2ban your node port instead of just SSH? Because bad actors try all kinds of things, like a SYN Flood. If your not into networking going into the topic of TCP and 3 way handshakes is beyond this discussion.
However to not leave you hanging I will give a short description. Imagine a SYN flood is like a game of doorbell ditch. Every time the doorbell rings you have to answer the door, you have no choice. But nobody is there. Unfortunately you still have to answer the door, so what happens if I ring your doorbell 100,000 different times per second? You waste a huge amount of time/thought (cpu cycles and memory) answering the door and very little time letting anyone in. This isn’t intended to give you an intimate understanding of the attack, but more to give you an idea why its important to prevent it.
We will release a dedicated post about fail2ban configuration. Once it is out we will update this section with a link showing installation, configuration and maintenance.
SSH Hardening
SSH is the doorway to remote access on your system. Securing it properly should be considered a requirement. Don’t get lax just because you enhanced your PAM authentication security. All of the changes here are implemented in the /etc/ssh/sshd_config file.
Disable Password Authentication (ie. SSH Keys Required)
Do not allow any user to login to your server via ssh without an RSA or DSA key improves security. Even if you had a weak passphrase of “happydays” for your ssh key, the attacker still needs to possess your private key to use the passphrase. While not considered a traditional 2FA/MFA setup you still need to have the private key and you need to know the passphrase. This is one of the best things you can do for your remote access security.
You can achieve this by setting the below parameter in your sshd configuration:
PasswordAuthentication no
Root Login Disabled
Do not log directly into root, even with ssh keys. This simulates a 2 Factor Authentication for root, as you need to login to another user before you can switch users to root for enhanced privileges.
You can achieve this by setting the below parameter in your sshd configuration:
PermitRootLogin no
Disable Empty Passwords
Explicitly disallow SSH login from accounts with empty passwords. Just because you created complexity rules earlier doesn’t mean accounts didn’t already exist without a password defined. Let’s make sure they cannot login just in case.
You can achieve this by setting the below parameter in your sshd configuration:
PermitEmptyPasswords no
If you’d like more details on implementing ssh hardening or would rather watch a video, we have that content available in a Security Breakdown: SSH Hardening post.
Least Privileges / Role Separation
Access Accounts & Service Accounts
Separating your access and service into separate user/accounts keeps from making a single door into your system that provides an attacker everything he needs on first login. Some secure environments (and not even the most secure) require using multiple layers to get to the system I’m working on:
- VPN with password + 2FA/MFA token
- Bastion/Jump host (RDP or SSH over the VPN)
- Final Server/Host
In this configuration my access layer accounts are the VPN and the Bastion host. These accounts have no privileges or way to escalate them. The VPN provides me network access to the bastion/jump host. From that host I can run RDP or SSH Clients to reach the final server. When I login on the final server I am still on an access layer account, and from there I switch user to a service account or to a privileged account (root).
Following this design may not prevent every attack, but it will mitigate a majority of them. Therefore I’m describing it in the hopes that it helps prevent at least 1 attacker from reaching your wallet and keys.
Access Accounts
Access accounts with SSH keys are how you login. Your access layer account does not have sudo permissions at all and requires using su and a password to access root or your service account.
Service Accounts
Service accounts do not have ssh keys installed. Given the above SSH hardening suggestions with only a password you cannot login via ssh directly.
Service accounts also do not get full sudo permissions. When sudo is configured it should require a password. Sudo permissions are restricted to only the commands the service account requires (systemctl restart cnode.service, sendmytip, etc.).
PAM Authentication
PAM is Pluggable Authentication Modules. What that means is your login requirements are setup to be “plug and play”. You can modify the requirements for login by adjusting the order of modules and their parameters. This topic is pretty deep, so we won’t spend a huge amount of time trying to teach you PAM, there are many guides intended for just that. At the end of this section a link is provided which provides steps and video for configuration of each suggestion. Changes to PAM modules will be made to files in /etc/pam.d/.
Password complexity requirements
You hopefully know this already. How many sites have you joined which require upper, lower a number and a special character? It’s pretty basic, so implement the features in PAM that prevent silly passwords like “11111111”, “happydays” and “password” from being used.
Instead of writing a policy and asking everyone to abide by it. You can configure the pam_pwquality.so module to handle it for you.
Password expiration (6 months)
We all hate it, but we need to flush passwords after some amount of time. Strict organizations use a 90 or 60 day policy. I’m not advocating you go extreme, but I think 180 days is an acceptable time frame to set password expiration if your running a stake pool.
PAM can expire passwords and force users to reset them. This can be handled in /etc/login.defs so all new users have these expiration’s. An existing user can have its expiration reset by using the chage command. When setting password expiration I like to adjust the warning period from 7 days to 21 days so the user time to prepare and update any password vaults.
Restrict reusing passwords
If passwords expire every 6 months then preventing reuse of the same password is needed.
PAM can do this by using the pam_pwhistory.so module in the /etc/pam.d/system-auth file. Mind you position of the module is important in this file, so if you want to know how to implement it checkout the link to the blog post below. Set the parameter to remember 5 passwords:
password requisite pam_pwquality.so try_first_pass local_users_only retry=3 authtok_type=
password required pam_pwhistory.so remember=5 use_authtok
If you’d like more details on implementing each of these PAM configurations check out Security Breakdown: PAM Authentication post.
MultiFactor Authentication
MFA: Google Auth
True Multi Factor Authentication. This requires that you have a google authenticator app on your mobile device. When you login you will be asked for a password or ssh key passphrase, and then be asked for your pin from the authenticator app.
MFA can be a bit tricky to install and configure so we suggest if you implement MFA you test it very carefully and have an account logged in as root in another shell while doing all the steps. If something goes wrong use the root login to revert your change so you don’t lock yourself out.
We will produce a separate post about MFA with Google Authenticator. Adding PAM & SSH hardening to MFA can sometimes get you locked out and take awhile to troubleshoot. Our MFA dedicated post will discuss SSH and PAM hardening in relation to MFA and provide an “All in One” configuration tying them all together.
VPN
In case you aren’t aware a VPN is a Virtual Private Network. A VPN allows you to communicate with other systems over the VPN in private, ie. your data is encrypted in transit between you and other systems on the VPN. You can use the VPN to allow access to SSH, while completely disabling SSH via cloud and software firewalls. You could also have your nodes/relays communicate over the VPN instead of the public internet. At CCIO we use it primarily to protect ssh and allow access to monitoring and metrics without otherwise allowing it through our cloud/software firewalls.
Wireguard
Wireguard is a great VPN with high speed and lower latency than IPSec and OpenVPN. For the average user who is not purchasing a Cisco ASA or other hardware firewall which supports VPN I would wager it’s probably the best choice available.
Installation and configuration of wireguard are outside of the scope of this discussion. However we will release a dedicated post discussing implementation of wireguard and will link it back to this post when complete.
Intrusion Detection
Intrusion Detection Systems (IDS) is a method to monitor your system for intrusion and alert you of an issue. While traditional IDS do not prevent access, there are Intrusion Prevention Systems as well. I have deployed both IDS and IPS at the host and network levels. For the general SPO at least implementing a host based IDS is a good start and achievable by most SPO’s.
AIDE
AIDE is used to monitor system/service configuration files and alert if something changes unexpectedly. It does so by creating a database of files, permissions and md5sums from regular expression rules. Once initialized it can be used to verify the integrity of your files if any of the values change.
Using this tool requires creating a new database of the system after patching and upgrading your nodes so it knows not to alert you to the changes.
Implementation of IDS is outside of the scope of this discussion, however we will create a post dedicated to installing, configuring and maintaining AIDE for your node. Once that post is up we will edit and link this section so you have the steps required to configure it properly.
| If you appreciate out content consider donating Cardano [ADA]: addr1qy4dsxzsv8ugujxwwzaakmhffnj28p3kht9kp6zsdsr63qy2rnwgwxsr44p308nc983nav4ylt62p88agrj0cxvqvy2qwfjaye Bitcoin [BTC]: bc1qe8z6xd5a2vfwqfxy0efllu6ausjkehfjhnlzcd Ethereum [ETH, ERC20]: 0xf8DA14868c18a489f2b4656e7500510ac44471A6 Litecoin [LTC]: ltc1qa4qqx2vhd8nacwuksnhrnmxak8kxqs08kx87aa |
 PoolTool.io
Comments are closed